Struggling to engage participants in virtual sessions? 7 strategies for creating more effective online gatherings

By Keeley Sorokti and Alyssa Dyar (guest blogger)

As a facilitator of a webinar, virtual team meeting or virtual class session, have you ever imagined what the attendees are doing while you attempt to engage them? Perhaps they have multiple windows up and are checking Facebook, sending an e-mail or running to the kitchen to grab a snack. Have you ever asked, “Does anyone have any questions?”, followed by deafening silence? In a world of constant distractions, how do we design and facilitate meaningful virtual sessions that connect and engage people to learn together?

In a blended or online learning environment, it is common to use web conferencing technology to facilitate synchronous class sessions. In our roles at Northwestern University’s MS in Learning and Organizational Change and School of Education and Social Policy, we help faculty design and facilitate virtual and hybrid class sessions using Adobe Connect, a web conferencing tool similar to WebEx or GoToMeeting. We work hard to make the sessions meaningful and engaging. Sometimes we succeed and other times sessions fall flat. Engaging sessions that create a learning community are usually a result of thoughtful design and facilitation.

We are often asked for tips on ways to create engaging sessions that avoid the dreaded talking head or voice plus slides that is so common. We decided to team up to share some of what we have learned about how to design and facilitate virtual sessions. Some of the tips may be specific to Adobe Connect, but most can be applied to any web conferencing tool. While our context is higher education, many of the tips shared here could be applied to virtual team meetings in a corporate setting or any virtual gathering.

1) Make the session seem effortless by creating a script with layouts that match.

Adobe Connect LayoutsMany instructors have found that teaching online requires more planning than in a face-to-face environment. It is important to have the entire class scripted out so that you can seamlessly direct students through the session and prepare back-up plans for issues that might arise. Use “Layouts” in Adobe Connect to plan out your entire class and keep them in order on the right hand-side so that you can easily move through the various layouts during the session. This will allow the facilitator to focus on the content, rather than the technology, while also helping to maintain participant engagement by varying the content and activities on screen.

Ideas & Application:

  • Upload any slides, videos, or other media in advance to avoid waiting for them to load during the session. Ask guest or student presenters to share their content with you ahead of time.
  • While you may vary the types of pods presented on screen (slides, polls, Q&A’s, etc.), we recommend keeping the attendee and chat pods visible as often as possible, and in the same location on screen, so that participants can easily refer back to them.

2) Take time at the beginning to review technology features and set session norms.
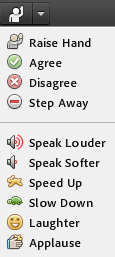
Adobe Connect raise handMake your students comfortable with the interface so that the sessions run more smoothly. Ideally, students participating in an online or blended course will have gone through an orientation process to become familiar with the basics, but if not, be sure to demonstrate how they can share their webcam, mute their audio, and use the chat. You may find students also need a tutorial on using the Share pod if they will be presenting. It is helpful to explain to participants how they can maximize pods for better viewing, and which actions affect all users (i.e. flipping through slides) versus only their own screen.

Determine which features will be most important for helping to manage your session – will students share their webcams? Will they use the status notifications? Be sure to set expectations for how you expect your students to participate, including where, how, and when they can communicate or ask questions (chat, hand raise icon, share webcam, etc.). For longer sessions, let participants know when breaks are scheduled so that they can get water, use the restroom, etc. and encourage them to use the Step Away status to indicate if they are not available.

Ideas & Application:

  • Set norms about how the chat pod will be used. Specify whether students should use the chat pod for social banter. This can help establish comfort and ease in a virtual environment, but some instructors (and participants) may find it distracting. Providing a separate chat window when you want students to answer a question or share their thoughts on a topic can help to focus on a particular topic while still allowing for important social interaction and connection.
  • As the instructor, keep your attendee pod in “Status View” so that you can keep an eye out for raised hands.
  • Make sure participants know how to message the host directly if they need to send a private message.
  • Send a reminder email ahead of each session with a direct link to the meeting room, objectives/topics that will be covered, and what they should have prepared ahead of time. Include troubleshooting tips and reminders of the session expectations that have been previously discussed.

3) Use webcams to make your sessions more personal.

In the online environment, it can be difficult to instill a sense of personal connection. Utilizing webcams can help make the session feel more like a face-to-face conversation. Not only will it help to put a face to the voice, but it makes it much easier for you (and your students) to use humor, sarcasm, etc. when users can see facial cues to help decipher tone. It is also more difficult for students to multitask if they are on camera. While it may be overwhelming to have every participant’s video on screen while content is being shared, be sure to display the presenter’s webcam to maintain engagement. With small classes, you may want everyone to share their cameras during class discussions and breakout sessions.

Keep in mind that some students and facilitators may be uncomfortable sharing their webcam. Demonstrate how they can share their webcam and pause the video so that other users only see their picture, rather than a live stream. While less dynamic, being able to see a photo at least helps classmates (and you) put a face to the name/voice. Similarly, explain to students that they can pause other users’ video streams if they find it distracting or if it is using up too much bandwidth (this will only pause the others’ video on their own screen, not for everyone).

Ideas & Application:

  • Utilize the “Filmstrip” view to allow multiple (or all) users to share their webcam, while only highlighting one camera at a time, presumably the speaker’s.
  • Have everyone share their webcam at the beginning and end of each class session (Hollywood Squares-style). Then begin the session with a quick icebreaker. This could be a quick reflection question (such as, What did you learn this week?) or fun personal topic to get to know each other. For icebreaker ideas, see the Tone/Climate section of ADDING SOME TEC-VARIETY 100+ Activities for Motivating and Retaining Learners Online.
  • End the session by sharing webcams again and asking participants to respond to a prompting question (such as, Share one thing you will do this week differently as a result of what you learned tonight.) Ending this way can feel less abrupt, while fostering personal connections. It promotes the creation of a learning community.

4) Make the session interactive.

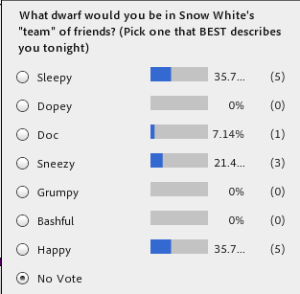
In order to maintain engagement, try to involve the participants as often as possible. If you have been talking to your slides for more than five minutes, it is probably time to engage the attendees in some way before you lose them. Use polls and discussion questions to break up the content. Polls can be multiple choice or open-ended, and you can share the results with the class. This can be a great way to check understanding, survey opinions, and more. To switch-up the class dynamic and help participants better digest the material, sort them into smaller groups using Adobe Connect’s “Breakout Rooms”. Participants can be randomly or selectively put into groups, and hosts have the ability to move from room to room to check-in and facilitate discussion.

Ideas & Application:

From Erica Kalata, MSLOC 421 Advancing Learning & Performance Solutions Instructor

From Erica Kalata, MSLOC 421 Advancing Learning & Performance Solutions Instructor

  • Have something for attendees to do when they join the room. They can draw something on a whiteboard as an icebreaker, answer a poll or answer a question in a chat pod about what they learned that week. Pull them in immediately as opposed to having them go look at Facebook while they are waiting for everyone to arrive.
  • Encourage the use of webcams in breakout rooms to make the conversations more personal. Provide a “Notes” pod for each breakout room to jot down their thoughts – these can be shared back into the main room after breakouts have ended.
  • Use the messaging feature to send out warnings when breakout rooms will end, as it can be jarring to be in a small group discussion and then suddenly back in the main room. Give a warning a few minutes ahead of time, and then 30 seconds (and maybe even 5 seconds) before you bring everyone back.

5) Reflect back what you are seeing in chat.

In using the chat (and polling) features of Adobe Connect, it is important to pay attention to what students are saying and respond to students’ comments. Not only will this validate the use of the function and encourage participation, it can provide jumping points for deeper conversation. Specifically, in watching the chat, pay attention to trends, contrasting arguments, and comments from less-vocal students. Do not feel obligated to acknowledge every comment; give students the opportunity to respond to each other and create a dialogue between themselves.

Ideas & Application:

  • You can put multiple chat pods in a single layout and ask several different questions that students can respond to. After some silence start commenting on a few of the comments so that people feel acknowledged and it spurs more conversation.
  • With larger classes, it may help to have a facilitator, in addition to the instructor, to monitor the chat function. The facilitator can help answer questions, draw attention to interesting comments, and provide tech support as needed.

6) Be comfortable with silence.

quietMany people are more uncomfortable with silence in the virtual classroom than they would be in a traditional classroom. This has been eased slightly by sharing webcams more often so that facilitators are talking to people they can actually see — webcams seem to help the facilitators relax.

Instead of plowing through material, try relaxing into the space and allowing the participants to do the same. We often coach faculty to stay silent after asking a question or opening up discussion until they feel uncomfortable with the silence. And then stay silent for another 30 seconds after that. This not only allows the participants who may still be processing to think before the class moves on but also breaks up the rhythm of the session and makes people take notice. Remember, in a virtual environment it is difficult to notice if someone is thinking and about to speak. Participants are often more reluctant to interrupt in a virtual environment because they are unclear about how to get the facilitators attention.

Ideas & Application:

  • Use a timer for yourself to make sure you are giving participants time to process. Often an “uncomfortable” silence is perceived as much longer than it actually is.
  • Design some activities where students are writing something down on their own notepad at home in silence for a few minutes.
  • Remind your students to use the status icons to notify you when they want to speak. Be conscious of these icons and be sure to acknowledge them in a timely manner.

7) Create artifacts as a group for later digestion.

You can easily create and share artifacts that allow for real-time reflection and also open up possibilities for post-session learning and asynchronous discussion. While you have the option of recording an Adobe Connect session, smaller, more tangible artifacts (slides, notes, or chat transcripts) may prove more useful for your students to reflect back on the content. If using a learning management system or online community, provide a space for students to keep the discussion going – this is especially important in connecting the topic with the course overall.

Ideas & Application:

  • The host of the Adobe Connect session can e-mail the chat transcripts and then post them in the online class space or in a Google Document.
  • Create a Google Doc during the virtual session for silent brainstorming and individual reflection. The content in the document can be used to generate online discussion questions or can be revisited at a later time.
  • During (or after) the session, make note of interesting comments or topics that arise. Use these quotes to spur a deeper discussion in your learning management system or online community.

Share your ideas and experiences.

What have you found to be helpful in creating engaging and meaningful learning experiences during virtual sessions?

We are especially interested in hearing from attendees of virtual sessions. What works for you as an attendee of webinars or virtual class sessions? What doesn’t work?

We are always looking for new ideas so that our class sessions don’t all follow the same script. Continuing to find new ways to engage can be difficult so please share your experiences and questions by making a comment on this post.

Resources

Great Webinars: How to create interactive learning that is captivating, informative and fun by Cynthia Clay

ADDING SOME TEC-VARIETY 100+ Activities for Motivating and Retaining Learners Online (free e-book PDF) by Curtis J. Bonk and Elaine Khoo (The Ten Online Activities in Principle #1: Tone/Climate section has great ideas for icebreakers.)

What are some other resources you have found helpful?

Photo Credits

img_0005 via photopin (license)

Shhhh via photopin (license)

Drinking from the Online Firehose — Preparing for the #FutureEd Coursera #MOOC

A few weeks ago, my colleague Jeff Merrell and I decided to participate in two different MOOCs (Massive Online Open Courses) related to education that are running at the same time. We have regular morning chats over coffee to catch up on what we are learning about the content in each course as well as the learning ecosystems being created. We tried this divide and conquer strategy last year in order to learn from each other and it worked quite well; in 2013 Jeff participated in #etmooc (Educational Technology and Media) and I participated in #edcmooc (E-Learning and Digital Cultures). I found it fascinating to watch the interaction between two MOOCs that cover related topics and take place at the same time.

This winter Jeff is participating in Dave Cormier‘s #rhizo14 Rhizomatic Learning – The community is the curriculum MOOC and I’m in the #FutureEd History and Future (Mostly) of Higher Education Coursera MOOC being facilitated by Cathy Davidson.

Screen Shot 2014-01-30 at 10.39.37 AM

Participating in #edcmooc last year was intense to say the least. I learned some things along the way about how to filter out some of the online noise so I could focus on content that supported my own learning goals and helped me develop my personal learning network. As I started exploring the #FutureEd Coursera discussion forums this week I came across a forum about Twitter that reminded me of how overwhelmed I was last year. One of the participants posted the following comment about Twitter:

Don’t you find the word limit a bit of a struggle?  And how quickly does your tweet disappear in the flood of other tweets?  It is a challenge to even read all the posts coming in.

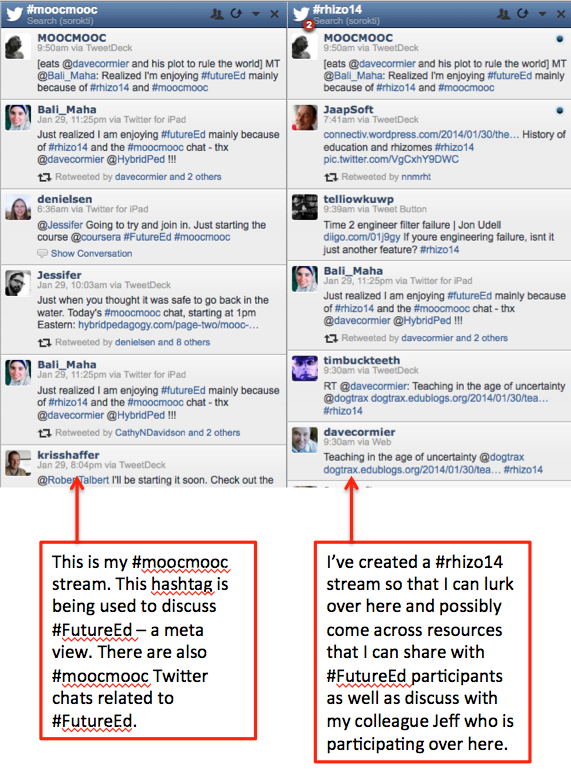
In the hopes that some fellow MOOCers might more easily join in on the Twitter conversation, I share below how I have set myself up to wade through the flood of #FutureEd, #rhizo14 and #moocmooc tweets to find the treasures that can be uncovered.

How do you drink from the social media firehose? Share your practices in the comments.

Find Your Fellow Learners

My brain cannot wrap itself around the massive part of MOOCs so I almost immediately attempt to connect with a few people online who are in the class and are active in the spaces that I use on a regular basis. I can’t be everywhere so why not find people who I am likely to bump into more easily with my existing online practices? Before the class began, I started following the #FutureEd hashtag on Twitter in order to create a public Twitter list of people who are using the #FutureEd hashtag.

Screen Shot 2014-01-30 at 11.42.35 AMCreating a public Twitter list does two things:

  1. Starts to create a community of learners who can more easily connect with each other during and after the course
  2. Allows me to follow the tweets from people on the list in a social media management tool called Hootsuite (see below)

When I add people to this #FutureEd Twitter List they get notified that they have been added and they can subscribe to the list and decide whether they want to follow other #FutureEd participants on the list. I have found that focusing on the human element while participating in a MOOC is what motivates me to stay involved — see My Human Element in the EDCMOOC.

In addition to finding fellow learners on Twitter, I also found them in Google+ and created a #FutureEd Google+ Circle for myself. Check out what is being shared on Google+ about #FutureEd. There are some people who prefer Google+ and I don’t want to miss out on what they are sharing.

The Power of Hootsuite: Create Filters to Slow Twitter Down

Screen Shot 2014-01-30 at 10.39.02 AM

HootSuite is a social media management tool that allows you to sift through the the onslaught of information that bombards you when you try to learn via social media. What follows is an explanation of how and why I will be using this tool to follow the #rhizo14, #FutureEd and #moocmooc tweets. I’m sure there are other similar tools out there as well – share in the comments!

I find that setting up Search streams in HootSuite helps me quickly scan through tweets that might be of interest based on particular hashtags. Note that you can use OR searching to have one stream bring back tweets from different hashtags that you want to group together in some way. I can’t imagine using Twitter without a tool like HootSuite. I do not monitor Twitter on a regular basis so want to be able to see older tweets that I would miss if I only look at my real-time stream. Screen Shot 2014-01-30 at 12.51.59 PM

Screen Shot 2014-01-30 at 12.51.32 PM

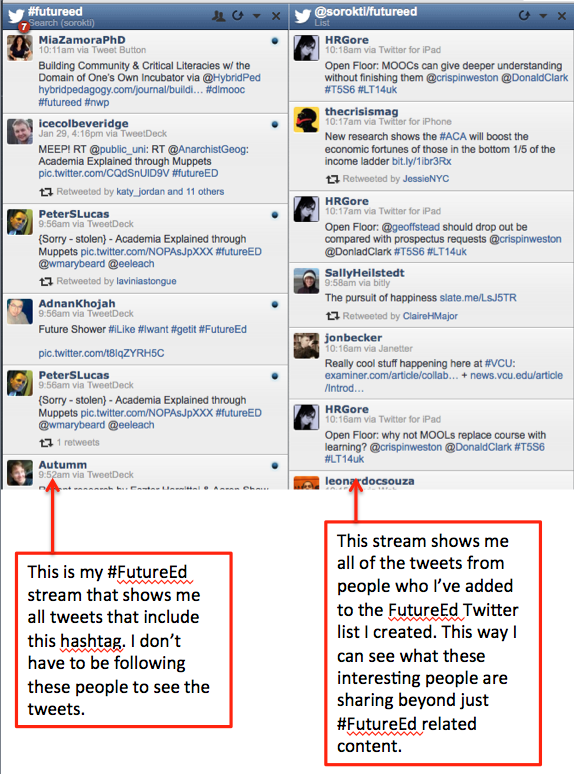
Screen Shot 2014-01-30 at 12.51.50 PMAnother great feature of HootSuite (and I swear they aren’t paying me to say this) is that you can create a stream that follows a particular Twitter list. So, for example, I have a HootSuite stream that is showing me all of the tweets from people on the #FutureEd Twitter list I created.

Q: Why would I want to do this in addition to following the #FutureEd hashtag in a stream?

A: Because I can learn so much more and further develop my PLN (personal learning network).

When I follow a list in HootSuite, I see all of the tweets from everyone who has been included in that list, not just the tweets that include the #FutureEd hashtag. I’m going to make an assumption that people who have signed up to participate in #FutureEd are a pretty interesting bunch (and this has proven true so far!) so I’d like to see what else they are sharing on Twitter, not just their #FutureEd tweets. And this is one of the benefits of building a personal learning network. I will likely learn something new from one of these tweets. I will be able to get a sense of who amongst this group of seminar participants I might want to connect with in other ways outside of the context of this particular online seminar.

Screen Shot 2014-01-30 at 12.30.12 PMNOTE: This is a remix of a previous blog post I wrote while participating in an open online seminar called Exploring Personal Learning Networks.

It is also an attempt to #showyourwork, an idea put forth by Jane Bozarth.

firehose photo credit:  donnaidh_sidhe via photopin

How would you explain “Personal Learning Network” to your mother?

In the Introduction to PLNs Week 2 virtual session of Exploring Personal Learning Networks: Practical Issues for Organizations (#xplrpln), Kimberly Scott and Jeff Merrell (seminar facilitators) challenged the participants to come up with a way to explain the concept of a Personal Learning Network to our mothers.

Here’s my definition. I’ll test it out on my mother later this week.

Keeley PLN DefinitionHere are some responses I’ve received from my own (and expanding rapidly) personal learning network. I asked on Twitter because it forces short answers!

Stephen Judd PLN - momBree - PLN
Screen Shot 2013-10-15 at 11.06.13 PM Screen Shot 2013-10-15 at 11.06.39 PM Screen Shot 2013-10-15 at 11.06.49 PMScreen Shot 2013-10-15 at 11.07.03 PM

Tweet me (@sorokti) your simple definition of your Personal Learning Network and I’ll add it to the Storify I created. Or just make a comment on this post with your definition.

P.S. If anyone knows an elegant way to embed a Storify within a wordpress.com blog let me know in the comments!

photo credit: / juL / via photopin cc

Writing Oasis (and the power of HootSuite)

Creativity is not a talent. It is a way of operating. – John Cleese

I am currently enrolled in an online seminar called Exploring Personal Learning Networks: Practical Issues for Organizations (#xplrpln) where we were encouraged to try something new to kick off the seminar. The tweet below from Cathleen Nardi, a member of my personal learning network (PLN), helped me respond to this call for action.
John CleeseOne of my goals for this seminar is to work on blogging more regularly – I tend to get sucked into my long list of to-do items rather than taking the time to write. To combat this, I tackled blog writing in a new way this week after watching this 1991 video of John Cleese talking about the five factors to make your life more creative and to get into the open mode.

As John recommends, I sealed myself off from the rest of my hectic life by creating a writing oasis. I made a quiet space for myself for a specific period of time. And it worked!

How did I create the writing oasis?

  • I brewed a good cup of coffee and cleared off my dining room table (staring at bills and school fundraising forms is not helpful to this endeavor).
  • I did not log into the Jive community that I manage or into my e-mail (those are my derailers that help me procrastinate).
  • I watched Mr. Cleese again for inspiration and a good laugh — humor can’t hurt!
  • I set a timer for 40 minutes.
  • I picked one of the blog ideas that I have stored up in Evernote and just started writing thoughts down without worrying about the structure of the post.
  • I stopped when the timer went off.

I plan to create another writing oasis this weekend to come back and polish up the post before publishing it next week. I have designated Wednesday mornings as my writing oasis time so if you try to reach me prior to 10am that day I hope that I don’t get back to you until after 10:01am central time.

Will I be able to turn this into a habit? I hope so. I’m going to reread a series of blog posts from my colleague Susan Barrett-Kelly about forming new habits over the weekend to pick up some more tips.

1) Change Habits, Keep Resolutions | The Development Sherpa

2) Make Your Habits Your Allies | The Development Sherpa

3) Never Too Old For New Habits | The Development Sherpa

I’m writing this blog post as a result of reading a blog post by Lauren Klein in the Jive Software user community: Blogging – How to Get Started? She recommends to just do it!

What blogging technique has worked for you? Please share!

SIDE NOTE: The Power of HootSuite

In this week’s first #xplrpln Twitter chat, there were some fellow participants who mentioned that they had not tried HootSuite as a way sift through the the onslaught of information that bombards you when you try to learn via social media. So I thought I’d share why and how I use this tool. I’m sure there are other similar tools out there as well – share in the comments!

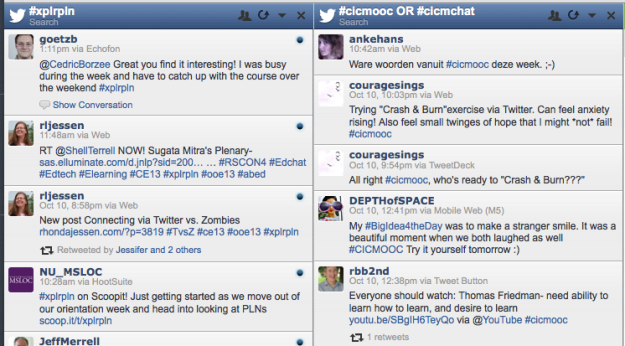
In an effort to #showyourwork, I’ve shared how I happened upon Cathleen’s tweet below. Cathleen, Rick Bartlett (@rbb2nd) and several other #edcmooc colleagues are currently enrolled in a massive open online course (MOOC) called Creativity, Innovation and Change that I have been following on Twitter at #cicmooc. While I decided that I couldn’t commit to enrolling in #cicmooc during this busy time for me professionally, I have been reading a few blog posts and lightly following the tweets by watching a stream in HootSuite that appears next to my #xplrpln stream. Cathleen’s John Cleese tweet appeared in my #cicmooc HootSuite stream earlier this week.

I find that setting up Search streams in HootSuite helps me quickly scan through tweets that might be of interest based on particular hashtags. Note that you can use OR searching to have one stream bring back tweets from different hashtags that you want to group together in some way. I can’t imagine using Twitter without a tool like HootSuite. I do not monitor Twitter on a regular basis so want to be able to see older tweets that I would miss if I only look at my real-time stream.

Hootsuite

My Hootsuite Tab called ‘Online Learning – MOOC’

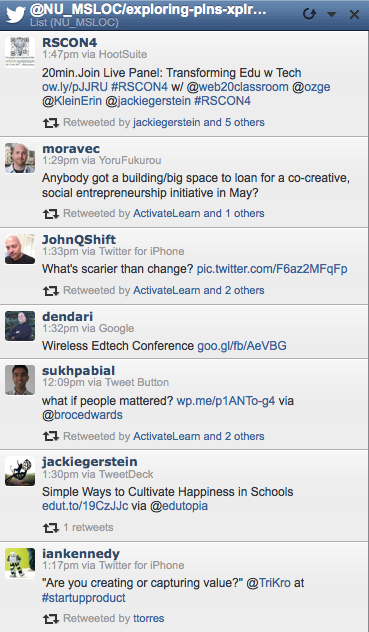
Another great feature of HootSuite (and I swear they aren’t paying me to say this) is that you can create a stream that follows a particular Twitter list. So, for example, I have a HootSuite stream that is showing me all of the tweets from people on the @NU_MSLOC #xplrpln list, all participants in this seminar.

Q: Why would I want to do this in addition to following the #xplrpln hashtag in a stream?

A: Because I can learn so much more and further develop my PLN.

When I follow a list in HootSuite, I see all of the tweets from everyone who has been included in that list, not just the tweets that include the #xplrpln hashtag. I’m going to make an assumption that people who have signed up to participate in #xplrpln are a pretty interesting bunch (and this has proven true so far!) so I’d like to see what else they are sharing on Twitter, not just their #xplrpln tweets. And this is one of the benefits of building a PLN. I will likely learn something new from one of these tweets. I will be able to get a sense of who amongst this group of seminar participants I might want to connect with in other ways outside of the context of this particular online seminar.

This is a stream of @NU_MSLOC's #xplrpln Twitter List

This is a stream of @NU_MSLOC’s #xplrpln Twitter List


photo credit: Paul Stevenson via photopin cc

Exploring Personal Learning Networks – #xplrpln

I’m not Catholic but I feel like I should start this post with, “Forgive me father for I have sinned. It has been six months since my last blog post.” Instead of wallowing in guilt, I choose to take some advice that my colleague Jeff Merrell recently shared about it being okay not to blog on a regular basis. He said to view blogging on a glacial scale – it’s okay to move at an extremely slow pace. Over time there will be some nuggets of wisdom built up or at a minimum some reflection on my learning journey that might help me gain some insight.

So what prompted me to pick up the virtual pen again? I recently registered for an open online seminar called Exploring Personal Learning Networks: Practical Issues for Organizations that runs from October 7 – November 8, 2013.  We will be exploring the following question:

How might it be possible for organizations and individuals alike to benefit if individuals develop personal learning networks within and outside the enterprise–namely, their employers?

I hope you will join me — register by October 1.

If the purpose of a personal learning network is to help me focus on my learning (and to support the learning of others), it seems a good place to start is to identify what I want to learn during this online seminar. Here are some initial thoughts which I hope to refine over the next few weeks leading up to the official kick off:

1) DEVELOPMENT OF ORGANIZATIONAL LEARNING NETWORKS: One question I have been pondering is how personal learning networks and organizational learning networks (OLN?) interact with each other. By organizational learning network I mean the external network of people and organizations that members of an organization intentionally decide to learn from, through social media and other methods, in order to meet the organization’s learning and strategic goals. I am distinguishing this from an individual’s personal learning network. At this point I am not even sure if this is a valid construct but we are experimenting with building an organizational learning network within my own organization so I am curious if others have too.

If individuals within an organization enhance their PLNs will that enhance the organization’s learning network both inside and outside the organization? Are there ways to make that an intentional process as opposed to solely something that happens by chance? Do many organizations even think in these terms?

How might the intentional development of an organizational learning network be the same or different from the development of a personal learning network? For example, an individual can include a disclaimer on social media accounts and blogs to make it clear that she speaks for herself not for her organization. Organizations have no such disclaimer and often limit their social media accounts to marketing megaphones. This probably reduces the ability to experiment as they build a learning network.

2) THE CARE AND FEEDING OF PERSONAL LEARNING NETWORKS: I am also interested in exploring the ways that personal learning networks are nurtured (or neglected) over time. How similar or different are PLN relationships that start via online technology from friendships or work relationships that are started via face-to-face interactions?

Once I decided to register for this upcoming online seminar, I was excited to connect with some members of my PLN who I thought might be interested in exploring these topics. Then I realized that I was a bit reluctant to reach out because I hadn’t been in touch lately and I wondered how this invitation would be perceived. Some of my E-learning and Digital Cultures (#edcmooc) colleagues have invited me to various open learning opportunities over the past six months. While I initially intended to join them, I made other choices about how I spent my time — Chicago is just too beautiful in the summer. Has this been perceived as lack of interest in continuing to learn together or just simply as not being the right time for me? It is certainly the latter for me, but I am not sure I adequately conveyed that when invited.

This begs the question…how are online PLN relationships different from other types of relationships if at all? How do we read social cues in 140 character tweets from people we have never met in person? It seems there is a skill to develop in this area.

In order to truly include someone in our PLN do we need to go deeper than interacting with him or her on Twitter by using tools such as VoiceThread and Google+ Hangouts or leveraging techniques such as quad-blogging? For me, I am finding that there are various levels of connection within my PLN. Some people are in my PLN but they may not realize that they are helping me learn or even know who I am. Others are people who I would meet for coffee or a meal if I visited their city.

I intentionally start this next learning experience with more questions than answers. What are the questions that are surfacing for you as you start reading the seminar materials? How can we support each other in our learning?

Related Resources

#xplrpln – Introducing PLNs

Personal Learning Networks: Knowledge Sharing as Democracy by Alison Seaman

Personal learning networks – notes and resources by Jeff Merrell

The Personal Pull into Social by Jeff Merrell

Business+MOOCs: the Hangout recording | Business+MOOCs tweetstream on Jay Cross’ blog
photo credit: Anne Davis 773 via photopin cc

Is this Coursera Statement of Accomplishment Worth Anything?

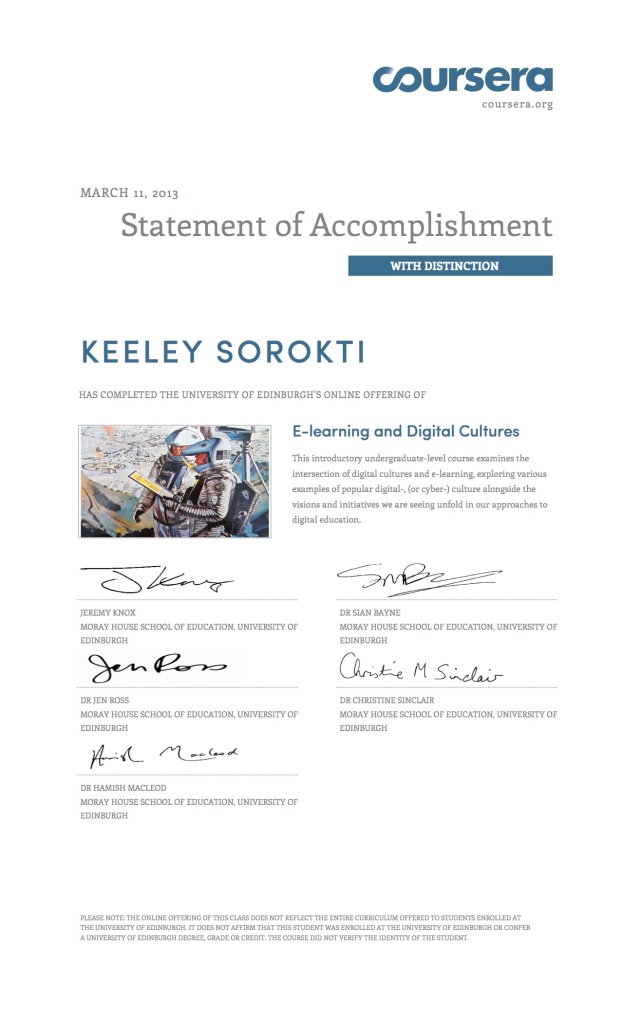
I received my E-learning and Digital Cultures MOOC statement of accomplishment today. This has me thinking about assessment and certification.

The Voice Thread #EDCMOOC small group that I credit with helping me finish the course (see My Human Element) recently had a post-MOOC reflection synchronous conversation via a Google+ Hangout. One of the topics we discussed was assessment and certification, especially in an age of MOOCs and sites like Khan Academy. Felicia Sullivan brought up the idea of creating ways for certification to be separated from the course itself so that students/learners might be more inclined to focus on the learning. In other words, you could learn in various ways and then be assessed by some external body in order to show your mastery of a particular topic.

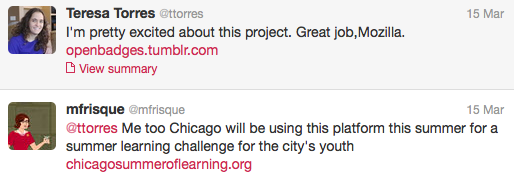
My MSLOC colleagues, Michelle Frisque and Teresa Torres, tweeted today about Mozilla’s Open Badges program which helped me further my thinking on this topic of certification. This is why I love Twitter!

Screen Shot 2013-03-16 at 3.28.12 PM

This type of badging program might offer a way for an individual to document his or her learning that happens outside of formal school settings. From their wiki:

Learning today happens everywhere, not just in the classroom. But it’s often difficult to get recognition for skills and achievements that happen outside of school. Mozilla’s Open Badges project is working to solve that problem, making it easy for anyone to issue, earn and display badges across the web — through a shared infrastructure that’s free and open to all. The result: helping people of all ages learn and display 21st century skills, unlock career and educational opportunities, and find new life pathways.

As Michelle Frisque mentioned, the City of Chicago is running Chicago Summer of Learning, a badging program using Mozilla’s open badge tool. The city is encouraging Chicago youth “…to engage in hands-on learning opportunities—particularly in science, technology, engineering, arts, and math”. I just signed up and am curious to see how my boys respond. I am starting to focus more and more on helping my boys engage in thoughtful ways with the technology that surrounds them as well as help them learn how to be intrinsically motivated life-long learners.

This Summer of Learning program seems like a great way to encourage the children of Chicago to keep on learning in a more free way over the summer! There are some compelling arguments for this type of system in this video by Mobile Digital Arts. It seems aligned with some of the ideas shared by Ali Carr-Chellman in her Ted talk called: Gaming to re-engage boys in learning.

So what is one to do with a Coursera statement of accomplishment? If you are curious what it looks like, mine is below. I’m not sure what I will do with this other than save it as a file on my computer. It certainly is not why I took the class. However, I do realize that there are particular contexts where this type of certificate might be important. There were some people who were expecting to get this statement almost immediately after the course finished and seemed upset that it was taking so long. I wonder how other EDCMOOC students are planning on using their statements of accomplishment? Maybe there will be a Cousera badge system via Mozilla soon – you can see a list of which organizations are currently issuing badges here: https://wiki.mozilla.org/Badges/Issuers.

EDCMOOC Statement of Accomplishment

That’s a wrap! Or is it?

I started this blog at the end of January 2013 with the following note in the About section:

This blog is a public place for me to think out loud and document my learning journey. On January 27, 2013 I started participating in the E-learning and Digital Cultures Coursera MOOC. I’m hopeful that this blog will help me reflect on what I am learning and become a repository of resources that I can refer back to in the future. Once the #edcmooc is over, we’ll see what happens!

This #EDCMOOC course is now officially over. I am happy to report that I am not a MOOC dropout anymore. I met all of my learning goals that I created in week one. I will admit now that I was not expecting this outcome.

  • I tried new digital artifact tools and even drew on an iPad.
  • I wrote a few blog posts and found that I actually like to blog!
  • I read and viewed at least some of the course content, although not as much of it as I would have liked.
  • And I definitely enhanced my own personal learning network! See my EDCMOOC PLN Google Map.

A few days ago, I submitted my digital artifact: EDCMOOC: A Maiden Voyage , finished reviewing three other artifacts and just reviewed my peer feedback. I appreciated this constructive criticism:

I have to admit however, that the thoughts did not seem organized (which is perhaps reminiscent of the class “hurricane-like” feel).

much more than this brief comment:

Nice Prezi that I enjoyed reading and looking at.

While this course may be over, I think this blogging / MOOCing adventure has just begun. I’ll leave the blog up because I think I might have some more to say!


I am new to MOOCs and am coming up to speed on all the lingo…cMOOC, xMOOC, etc. I found this blog post by Sarah Roegiers helpful.

Another interesting resource is the Business+MOOCs Google+ hangout recording from February 27, 2013 hosted by Jay Cross. It included a panel of MOOC / online community experts: George Siemens, Stephen Downes, Dave Cormier, Jerry Michalski, Mark Finnern, Terri Griffith and Lal Jones-Bey.

Doing by Learning (and vice versa)

It is a good season for “MOOCs”, Massive Open Online Courses, and you can spot several of them in full action. But the term “MOOC” has come to cover a range of wildly different  kinds of ehm… learning events. Indeed, for some of these, “course”, might be the wrong word.

It will probably not be long before we will start to use different words for different kinds of MOOCs.

In 2008, the term MOOC was coined to describe courses that were experimenting with the connectivist take on learning.

Later, the term was applied to free courses that were instuctor-led and structured around canned lectures and one course platform, but the need was felt to distinguish between the merely “free” courses and the courses with distributed contents, and matching leaner-centered approaches to the organization of the course. In came the distinction between cMOOC and xMOOC. But that good vs. bad model is…

View original post 535 more words

Levels of Scaffolding

The first blog post I wrote as an EDCMOOC student shared the scaffolding I put in place around myself as a learner in order to avoid dropping out of the course. I am happy to report that I stayed engaged the whole time and am ready for more MOOC’ing! Last week, Peter Taylor, left the following comment on my scaffolding post:

A blog post on different levels of scaffolding, http://wp.me/p1gwfa-sK
The first level is the one we think of in education, but I’d be interested to hear discussion on how that kind of scaffolding in MOOCs could lead to the other levels
[“1. Someone starts with a final structure in mind and provide the workers (or students) a safe scaffolding they use to complete the structure (or students come to understand the ideas and be proficient in the practices)…..”]

I am not an expert on scaffolding (I’ll leave that my colleague Kimberly Scott and others like Peter). However, I do think Peter’s question is an interesting one. How might the kind of scaffolding that I describe in the #EDCMOOC – Week 1 Scaffolding to Avoid Dropping Out post lead to the other levels of scaffolding that Peter describes for MOOC participants? But also, how does the scaffolding put in place by the instructors and other course participants enhance learners experiences and help them go deeper?

When I read Peter’s Scaffolding post, Level 3 stuck out for me. I’ll come back to levels 4 and 5 – need some more thinking time on those.

3. Someone (or someones) has (have) a synergistic cooperative or collaborative situation in mind—drawn from past experience and current understanding—and provides scaffolding to more than one group of workers (potential cooperators) to lead them towards a place where, if and when the groups meet, their interaction creates more than the sum of the parts. That is, like two sides of a bridge joining in a stable arch, the resulting situation is something no group could provide for itself (see strategic participatory planning)

In the Voice Thread group I’ve been part of during the EDCMOOC, we have been discussing ideas for ways to support various types of MOOC learners — how to provide scaffolding — so that individuals can meet their personal learning goals whatever they might be. I think that the EDCMOOC team at the University of Edinburgh definitely had a synergistic cooperative situation in mind, this EDCMOOC, and provided scaffolding to all of us which led us to all sorts of places where we met up and interacted. And from my own personal experience the interactions I’ve had with both the Voice Thread group and the group of #edcmchat students in the live Twitter chats have produced interactions and content that is much more than the sum of the parts.

So what does the scaffolding look like that produces the outcome described in Peter’s level 3 scaffolding? In the case of this particular MOOC, some of the ways that the teaching team provided scaffolding to foster 1 + 1 = 4 outcomes are listed below:

  • Designed a final assessment that is peer-reviewed instead of instructor-reviewed. This meant that in some cases people were forming groups or using existing social media communities to share their work prior to submitting. My Voice Thread group, for example, had a Google+ Hangout well before the due date of the final assignment where we shared drafts of the digital artifact and conducted a peer review that helped us iterate and tweak our final submissions.
  • Encouraged various ways of connecting with other students and course content. While there was a Coursera discussion area, it was not frowned upon if particular students, like me, wanted to interact on Twitter, Google+ or other places. In fact, it was encouraged (even though this makes the measurement of a MOOC difficult). In the two Google+ hangouts hosted by the teaching team, they answered questions on Google+ and Twitter — they met the participants where we were, not where the teaching team deemed we should be.
  • Directed participants to various groups to facilitate connecting with other students. During the second Google+ hangout, Christine Sinclair, spent some time talking about various groups  that were forming, specifically the Over 60 group. Jen Ross shared the EDCMOOC Voice Thread group with others in a blog post.

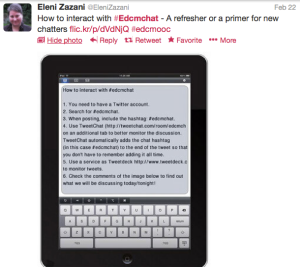
I also think that in a MOOC, the teachers/facilitators themselves are actually not able to provide all the scaffolding. Participants start emerging who provide some of this scaffolding. For example, Ary Aranguiz started the #edcmchat Twitter chat which was not part of the course design. Ary along with other Twitter chat hosts AndyDMMitchell, Eleni Zazani , and @kmallwein (list not meant to be comprehensive – many others played a role) did an excellent job of including Twitter newbies in the conversation with tweets like this one:

Screen Shot 2013-02-27 at 10.37.03 AM

Felicia Sullivan artfully provided scaffolding by being a quiet leader in the Voice Thread conversation. She seeded the conversation with a prompt and then replied quickly to member’s comments throughout the course, keeping us coming back for more!

But this is my experience. What are your thoughts on this topic?

  1. What are other kinds of scaffolding that could be used in future MOOCs to facilitate this kind of cooperation and collaboration amongst and between groups?
  2. Who was left out despite these various scaffolding methods?
  3. Were there things that didn’t work for you?
  4. Have you seen examples in other MOOCs where scaffolding was not put in place or didn’t naturally emerge? What happened?

photo credit: pni via photopin cc